In this Customization section, Orthopedic and Neurological Tests and Signs may be added or deleted from ChiroPadEMR, as well as editing the Full Description that is displayed at the bottom of the Ortho/Neuro window in the patient’s file. This is also where Ortho/Neuro Folders can be created, edited or deleted.
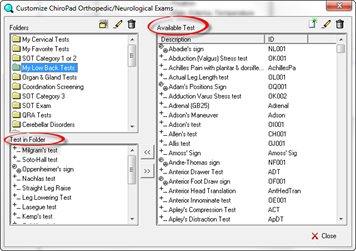
Click on Ortho/Neuro Exams in the Customize Menu. The Customize ChiroPad Orthopedic/Neurological Exams window (figure 2) opens. On the right is the Available Test box, listing all the Orthopedic and Neurological Tests and Signs that are in the system. The tests and signs are listed alphabetically by Description. On the left there are 2 boxes. The upper box lists all the Folders that have been created. These Folders are displayed on the patient’s Ortho/Neuro window. The lower box displays the Signs and Tests that are contained in a Folder, when that Folder is highlighted.
Before entering a new test or sign in ChiroPadEMR, check this list to see if the item needed is already in the program. Remember to use the scroll bar on the right side of the box. If the needed test is on the list, simply add it to the appropriate folder.
Figure 2
ChiroPadEMR arrives in the practice with hundreds of signs and tests in the system, as well as many Folders already created. Each practice is unique, and the Folders may require editing to be ideal for the practice. The editing may involve adding and/or deleting some items from one or more Folders, or it could be as comprehensive as deleting all the Folders that came with ChiroPadEMR and then creating those that are appropriate to the practice.