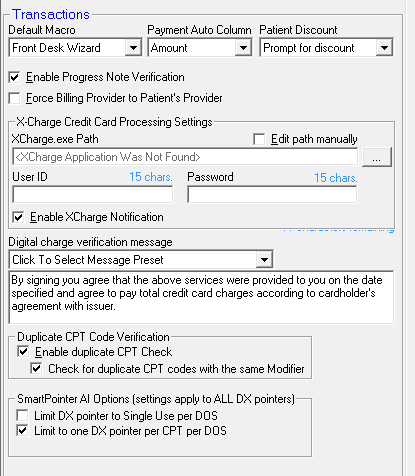
Transactions Preferences are critical to the smooth and rapid entry of Transactions in the ChiroSuiteEHR system. As shown in Figure 12, there are many items that can be modified to the needs of the practice.
Figure 12
Default Macro – There are 3 options to select as shown in figure 13. The options selected sets the default macro that is used in the New Transaction window when checking patients out. The selection chosen does not automatically make any Transaction entry if the Transaction window is entered outside of the check-out process.
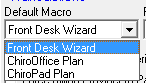
Figure 13
•Front Desk Wizard – This option compares the plan entered in the ChiroOffice appointment schedule with the plan entered in ChiroPadEMR. When the 2 agree, the transaction screen is automatically populated with charges for the day. If the 2 plans are different, then there is a pop up message (figure 12), asking which plan should be used. In order to have the doctor’s SOAP documentation match the billing, it is essential that the ChiroPadEMR plan be used. In order for this option to work it is necessary to also place a check in the box to Enable Progress Note Verification that is located just below the Default Macro drop down box.
•ChiroOffice Plan – When this option is chosen, the charges for the day will be entered automatically based on what was scheduled in the appointment book. This option is for those offices that use only ChiroOffice and do not have/use ChiroPadEMR.
•ChiroPadEMR Plan – The system looks only at the notes generated by ChiroPadEMR, and uses them to produce the charges on the ChiroOffice transaction screen. It ignores the ChiroOffice plan. This option frequently saves time at the Front Desk since there is never a pop up regarding a disagreement between the ChiroOffice Plan and the ChiroPadEMR Plan.
Payment Auto Column - This setting determines the behavior of the cursor on the transaction screen when you click on one of the payment (Cash, Check, Credit Card) buttons. If a Remark is rarely or never entered a payment is received from a patient, select Amount and the cursor will automatically appear in the Amount Column whenever one of the payment buttons is selected. If Remarks are normally entered when the patient makes a payment, choose Remark and the cursor automatically appears in the Remarks Column when one of the payment buttons is clicked.
Patient Discount – Be extremely careful when creating a standard discount for a patient. Medicare now prohibits the giving of gifts to patients in excess of $50.00 per year, and Medicare considers a discount to be a gift. Some States have also enacted legislation or regulation that greatly restricts the giving of discounts to patients. Verify both the Federal and State requirements for discounts before giving a discount to a patient. There are 2 options for the Patient Discount setting. The option you select applies to all patients for every transaction, but only if a standard discount amount was entered for the patient on the Patient Info Financial tab. If discounts were entered in the Financial tab, then it is necessary for the practice to determine if the discounts should be entered automatically.
•Prompt for Discount means that every time a transaction is entered the system there will pop up a message asking if the discount should be applied.
•Auto Apply Discount automatically enters the discount when the transaction is saved. There will NOT be any pop up message. If no discount was entered in the patient’s Financial tab, there will be no effect on that patient’s transactions.
Enable Progress Note Verification – Placing a check in this box turns on the pop up message generated by the Front Desk Wizard giving notification that the ChiroOffice Plan previously entered in the Appointment Scheduler does not agree with the current ChiroPad Plan entered in the SOAP note.
Force Billing Provider to Patient’s Provider – This option applies in multi-provider facilities in which one doctor may provide care to another doctor’s patient. When scheduling an appointment for a patient, the staff has the option of assigning the appointment to a Provider other than the one set in the Patient Info window. Depending on how the practice is operated, this has the potential to create a billing problem. If the fees charged should ALWAYS apply to the assigned Provider, then this option should be turned on. When this option is turned on, by having a check in the box, then regardless of which provider actually treated the patient or which provider was scheduled for the patient, the line item billing in the Transaction window will assign the charge to the Provider assigned to the patient in the Patient Info window. If the charges should ALWAYS apply to the scheduled Provider, then this option should be turned off. Note that the assignment of the charges can be reset for each line item at the time of check-out in the Provider Column of the Transaction window.
X-Charge Credit Card Processing Settings – If the practice is using X-Charge Card Services for processing credit/debit cards from patients, then setting up the Path, User ID and Password activate the integration of ChiroSuiteEHR with X-Charge. Once set, there should not be any reason to change these settings, unless X-Charge Card Services requires that it be done. There are 4 items that need to be addressed.
•X-Charge.exe Path – after the X-Charge software has been installed on the computer, ChiroSuiteEHR must be told where to find it. Click on the little box with 3 dots at the far right of this box to open a browser window. Find the X-Charge.exe file and click on it to enter it in this box.
•User ID – enter in this box the User ID given to the practice by X-Charge Card Services
•Password - X-Charge Card Services may provide a password, or ask the practice to provide one. In either case, enter the Password specific to X-Charge in this box.
•Enable XCharge Notification – This is a pop up advertisement about X-Charge Card Services. When there is a check in the box, and a staff person clicks the Credit Card Payment button on the Transaction Window in ChiroOffice, the pop up ad for X-Charge appears. When this is NOT checked, the pop up does not show.
Digital charge verification message – For those offices that have incorporated the Topaz Signature Pad into the ChiroSuiteEHR system for Patient Sign Out, it is critical that there is a message that displays that the patient sees and agrees to. This box sets the message that is displayed, which is similar to the credit card signature pads in the major stores. In the drop down box, there are 2 selections. The practice has the ability to edit the messages in these selections.
•Basic Verification Message – This is a statement that any patient could sign, whether or not he/she has a credit card.
•Verification Message with Charge Agreement – This statement is the legal requirement from the card processing company, and usually contains language that the card processing company demands.
By using the signature pad, the patient signs out after receiving the care provided. This provides proof that [1] the patient was in the office; [2] the patient knew what services were provided; [3] the patient agreed to and accepted those services; and [4] that the patient is responsible for the payment for those services. The bottom line is that using the signature pad gives the practice audit and collection protections. If the practice does not yet have the signature pad and would like to add it, call Life Systems Software Support at 800-543-3001for pricing and to order.
Duplicate CPT Code Verification is a safeguard to prevent entering 2 line items with the same CPT code. This is of critical importance to those providers that would receive claim rejections if 2 line items for the same date of service had the same CPT code. However, there are some providers that are required to use 2 or 3 line items for specific treatments that must use the same CPT code on each line. The result is that there are 3 possible options:
•For those that need this CPT line item restricted to using the CPT code only once per date of service, then place a check in the box to Enable duplicate CPT Check.
•If the practice has occurrences when the same CPT code must be used for 2 line items on the same date of service, but with a different modifier on each line, then also place a check in the box to Check for duplicate CPT codes with the same Modifier.
•In the event that the practice has the requirement to use the same CPT code for 2 or 3 lines, then do NOT check either box.
SmartPointer AI Options (Settings apply to ALL DX pointers) – SmartPointer is a tool to automate the use of diagnosis pointing. A detailed chapter about SmartPointer is part of this manual, and it should be studied in detail. The settings here are a brief part of SmartPointer. In the Transactions Preferences, there are 2 options that relate to SmartPointer.
•Limit DX pointer to Single Use per DOS - This option limits the usage of each pointer to a single use for a given date of service. For example, if there are 4 line item services for today, and this option is set, when the SmartPointer system auto points to the number 1, it will no longer display the number 1 for any other line item on today’s date for the current patient; if it pointed to number 3, then 3 will not be displayed for any other line item on that date of service.
•Limit to one DX pointer per CPT per DOS - This option can be used with the first option or as a stand alone function. This option limits a single DX pointer for each CPT code. If there is more than one ICD code in a patient’s current diagnosis that could point to a specific CPT code, only one pointer will be used. For example, a patient has both 739.1 and 739.2 in the current diagnosis list. Both could apply to 98941. Selecting this option means that ONLY one will be shown as the pointer for 98941.