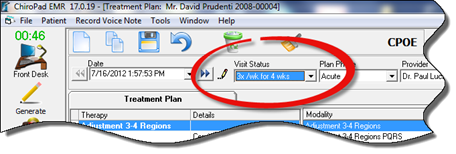
One method of scheduling appointments is part of the patient check-out process at the end of the visit. In the full ChiroSuiteEHR, the doctor would have completed entries in the ChiroPadEMR Plan window showing when, or at what frequency, the patient should return (figure 5).
Figure 5
When the patient moves to the check-out desk, in the ChiroOffice end of the system, staff right clicks on the patient name on the Front Desk window to pop-up a mini-menu. Then select Check Out (figure 6).
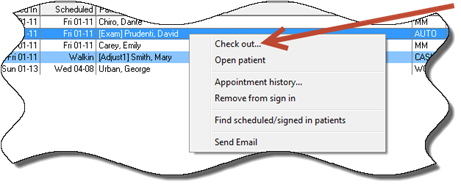
Figure 6
If the patient does HAS an appointment, ChiroSuiteEHR will automatically open to the Transaction window.
When the patient does NOT have an appointment, as part of the check-out process, ChiroSuiteEHR opens directly to the Appointment Scheduler. For those offices that are using only ChiroOffice or only ChiroPadEMR, the Check-Out function also opens directly to the Appointment Scheduler if the patient does not have an appointment.
As the Appointment Scheduler opens (figure 7), as part of the Check-Out Process, there are several items to pay attention to:
Patient name and account number in the upper right corner. Confirm that the appointment is being set for the correct patient
Provider initials and name in the upper left corner. The patient is being scheduled for this provider. If the patient needs to be scheduled for a different provider, click on the drop down arrow and select the initials of the correct provider
Today’s date, that is, the current date, is circled in red.
The date the appointment is being scheduled for is circled in blue. Be sure to select the date for the appointment by clicking on that date.
Under the 3 month calendar at the lower left, the Visit Status entered in the Plan window of ChiroPadEMR is displayed.
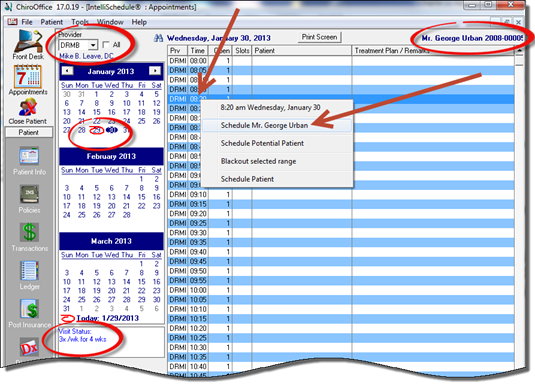
Figure 7
To schedule the appointment, right click or double click directly in the Time column on the specific time of the appointment. This will pop-up a menu that will display the time of the appointment and provide several options. Click on the item labeled Schedule [Patient Name] which will open another window (figure 8).
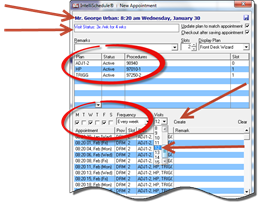
Figure 8
On the IntelliSchedule New Appointment window (figure8), there are several important items and options.
The patient’s name and time of appointment is displayed at the top of the window
Visit Status is displayed again on the next line, giving the staff the opportunity to verify the correct frequency of care
Remarks box allows the entry of information that will appear in the Appointment Schedule, together with the scheduled services.
Plan area is where ChiroSuiteEHR enters the services that are expected to be provided to the patient on the next visit. If you have set the system to default to the ChiroPadEMR Plan or the ChiroOffice Plan, the entry will be made automatically. The ChiroPadEMR Plan comes from the most recent entry made on the Plan window in ChiroPadEMR. The ChiroOffice Plan will enter the expected services based on the most recent entry in the Appointment Scheduler. Doctor and staff have the ability to change the list of expected services by clicking on the drop down list of services in the Plan column
Multiple Appointment Entry
There are check boxes for the days of the week. In the example shown above, the Visit Status indicates that the patient should have 3 visits per week for 4 weeks, resulting in checks in the boxes for Monday, Wednesday, and Friday.
The frequency defaults to Every Week, but can be changed in the drop down box if desired.
3 times 4 = 12, so to establish 12 visits for the patient, click the number 12 from the drop down box
Click the Create button to produce all 12 visits, which are displayed at the bottom of this window.
Multiple appointments scheduled in this manner will be for the same time of day. The system will overbook time slots.
After multiple appointments have been scheduled, each appointment can be moved to a different time on that date
Click Save to record the entries in the system
Once the appointments have been created, the next stop in the ChiroSuiteEHR and ChiroOffice check out is to go to the Transaction window to complete the visit. For those that use ONLY ChiroPadEMR, the check out process returns to the Documents window of ChiroPadEMR, to either complete the SOAP note or close the patient file.
Note that on the Transaction window, staff can click on the Future Appointments button to view and print for the patient, a list of all scheduled appointments (figure 9).
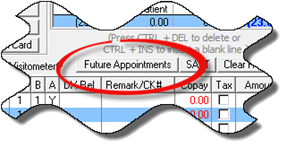
Figure 9