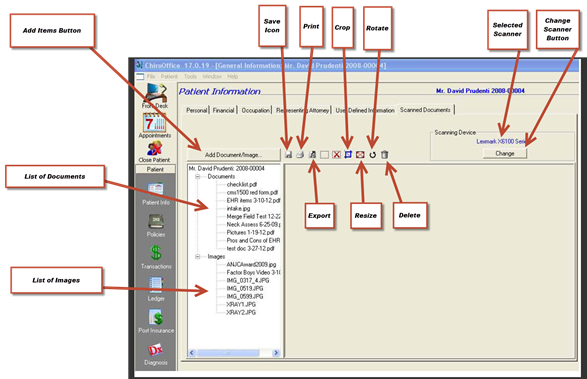
This tab is where documents and images (pictures) can be scanned or imported into the patient file. Click on the tab to display the Scanned Documents window (figure 12).
Figure 12
On the upper right, the scanning device that is connected to the program is listed. If there is more than one scanning device, such as other scanners or cameras, when needed click on the change button to switch to one of the other devices.
On the lower left, there is a list of the documents and images that have been scanned or imported into the patient file.
Once a document or image in the JPG or BMP format has been selected, the edit buttons are activated. These buttons include Save, Print, Export, Select, Crop, Resize, Rotate and Delete.
In the list of documents and images, there are files in 3 different formats, PDF, JPG, and BMP. Selecting a PDF image will open either Adobe Reader (a free program) or Adobe Acrobat (if it was purchased) and give a full page display of the item. Selecting a JPG or BMP item will display it in the gray box to the right of the list.
Adding a document or image to the patient’s ChiroSuiteEHR file is simple (figure 13). Click on the Add Document/Image button on the upper left of the window. The Add Document/Image window opens. Make the selections in the column on the left, click the big Scan button on the right, and the scanner and software will do the rest.
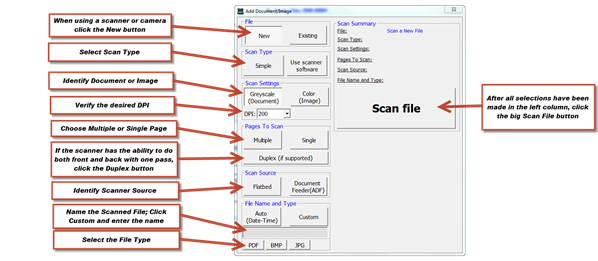
Figure 13
If the document or image is already on the office computer, or accessible over the office network, it can be imported directly into the Scanned Documents tab. Click the Existing button (figure 14). The Scan File button is converted into the Choose File button. Click Choose File and a browser opens allowing the search and selection of an existing electronic file that can be imported into the patient file.
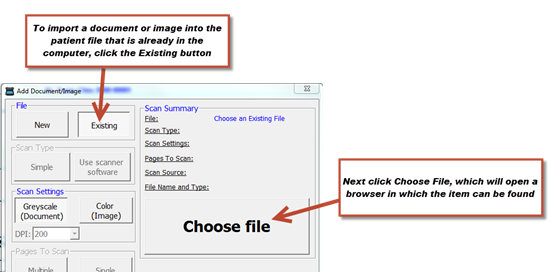
Figure 14
Once the documents and/or images are in the Scanned Documents section of the patient file, they can be accessed, viewed and printed at any time. If desired, they can be attached and sent via email.