This option should be used with great caution because it applies to EVERY claim in the patient’s Post Insurance Ledger. The only time this should be used is if and when EVERY claim in the patient’s file requires the same correction. If the correction applies to only one, or some, of the Open Claims in the Post Insurance Ledger, but not all claims, then do NOT use the Relock All Claims button.
The Relock All Claims button is the Key with the letter A (for All). After the correct information has been entered in the Insurance Policies window, return to the Post Insurance Ledger. Click on the Relock Insurance Information (Key) button that has the letter A. Every Open Claim will be changed to show the most current data that had been entered in the patient’s Insurance Policies window. Complete the process by resubmitting the claims.
Apply Refused/Writeoff% Button
After a Payment amount has been entered in the Paid field on the Post Insurance window, there is the option to click the Apply Refused/Writeoff% button. The Apply Refused/Writeoff% button looks like a single sheet of paper that was cut into 2 pieces. This is for an agreement with the patient. If the Transfer and Write Off amounts are based on a contract with an insurance carrier, then the entry needs to be made in the Intelli$ense Fee Schedule of the Insurance Carrier Catalog for the patient’s specific Insurance Carrier.
The Apply Refused/Writeoff% button is a time saver. When posting insurance Payments, if this button was set up, then a single click will enter the amounts NOT paid by the insurance company in the appropriate fields. This requires that the agreement is made with the patient in advance and that the set-up has been completed in the patient’s Insurance Policies window.
In the patient’s Insurance Policies window, on the lower left of the Billing tab, there are the Transfer% and Write-off% boxes. The entries in the 2 boxes must equal 100%. An entry of 100 in the Transfer% box means that anything NOT paid by insurance will be Transferred to Patient Responsibility. An entry of 100 in the Write-off% box means that anything NOT paid by insurance is to be Written Off.
Based on the agreement that is made with the patient, the Transfer% and Write-Off% may be set to any 2 numbers, provided that the sum total of those 2 numbers does not exceed 100.
NOTE: For Federal insurance programs, such as Medicare, and in some States for all insurance programs, any amount of the Patient Balance that is written off is considered a discount or gift. Medicare allows only $50 per year in gifts, and considers anything greater than $50 per year given to a patient to be an illegal incentive to entice patients into the practice. Be sure to verify in the State the practice is located in, what are the legal methods of giving discounts or gifts to those patient’s that require them.
Resubmit to Next Carrier Button
The Resubmit to Next Carrier button appears as a piece of paper with a red arrow on its left side going from the bottom of the page up to the top.
If it is necessary to Resubmit a Claim without entering any Payment, Transfer, or Write-Off information, then click on a Claim to highlight it and then click the Resubmit to Next Carrier button. This will commonly be used after correcting data in the patient’s Insurance Policies window and Relocking the claim.
Clicking the Resubmit to Next Carrier button populates the Resubmit To drop down box. Verify that the system chose the correct insurance carrier. If it is necessary to change to a different insurance carrier, click on the drop down arrow and select the correct carrier for this resubmission. If the correct carrier is NOT listed, then that carrier needs to be added to the patient’s Insurance Policy window.
Display Properties Button
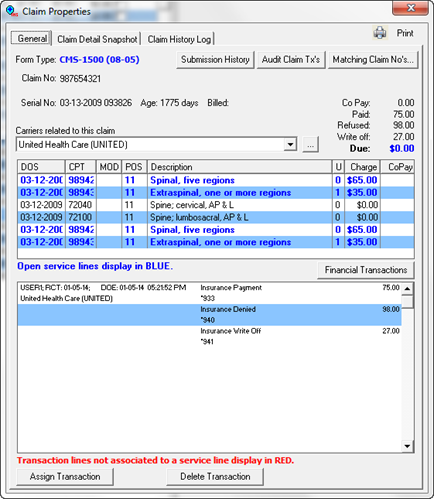
At the far right of the button line is the Display Properties button, a hand holding a document. Click the Display Properties button to open the Claim Properties window (figure 2). The Claim Properties window provides in depth detail about the selected Claim.
The Claim Properties window has 3 tabs and several buttons, each of which provides the practice with all the detailed information about the selected claim. The Printer button at the top far right enables the printing of a screen shot of the tab that is open.
Figure 2
General Tab
The first tab in the Claim Properties window is the General tab. On the upper left it shows the Form Type (Print Image, CMS-1500, GatewayEDI, etc.) that was used to submit the claim. Beneath that is the Claim Number, and under that is the Serial Number of the claim and the Age of the claim. The Serial Number is labeled as the Claim ID on the Post Insurance Ledger window. The next item is a drop down box that lists the insurance Carriers Related to this Claim. At the far right is a summary of what has been Paid, Refused, Written Off and whether or not there is a remaining Balance Due on this claim.
The block displaying DOS (Date of Service), CPT, POS (Place of Service), U (Units), and Charge, shows all the line items that were on this claim. If the line item is black, then it has been processed and closed. When the line item is blue, it means that the charge has not been posted, or was not assigned correctly.
The large Transaction Record box below shows which Insurance Carrier has processed the claim and sent an EOB to the practice. Once the items have been entered, the Transaction Record box displays the User ID of the staff member that made the entry, the DOE (date of entry) for the EOB information, and the amounts of Payments, Write offs, and Transfers to patient responsibility.
If one of these Transaction Lines has not been associated with a specific Service Line, then it will display in red. Staff is then given the option by clicking on one of the buttons at the bottom of the window to either Assign the Transaction Item to a Service Line, or to Delete it.
Claim Detail Snapshot Tab
The Claim Detail Snapshot tab provides a list of all the boxes on the CMS1500 form, and the information that was entered in those boxes for the claim. If no data was entered, the item will be blank. This is for the practice to know what specific information was on the claim when it was submitted.
Claim History Log Tab
The Claim History Log tab is a text box for staff to enter notes related to the claim. For example, if it is necessary to follow up with the insurance carrier about this claim, then staff can enter in this tab the date and time of the contact, who was spoken to at the insurance company, and what the office staff was told. This may be very useful for the historical record of collection attempts for unpaid or underpaid claims.
Submission History Button
The Submission History button provides access to a crucial item when it is necessary to prove timely submission of a claim. Click the button to open the Claim Submit History window (figure 3). Every time a claim is submitted, the ChiroSuiteEHR system logs a record of the submission. The record shows the DOS (dates of service) that the record applies to, the Date Submitted, which Carrier it was submitted to, the Form Type (paper or electronic), and which staff member made the submission. If necessary, this Claim Submission History can be printed and is legal proof of timely filing.
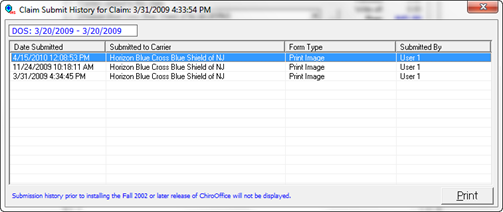
Figure 3
Audit Claim Tx’s Button
Clicking the Audit Claim Tx’s (Transactions) button runs an audit on the patient’s account. The system reviews all the Transaction entries for Services billed, and amounts entered as Paid, Write-Off and Transfer for the specific claim. If errors are found, ChiroOffice recalculates the Line Item balances and the Claim balance, and resets the appropriate values.
Matching Claim No’s Button
The Matching Claim No’s button produces a list of all patients that have the same Claim Number as the Claim Number that is being used on this patient’s claim. The most common occurrence for this is an auto accident in which several people in one vehicle (usually family members) all became patients of the practice and the insurance carrier has placed them all under the umbrella of a single Claim Number. This was more common in the past, but has been left in the ChiroSuiteEHR system since it may still occur.
Financial Transactions Button
The Financial Transactions button makes it easy to correct a posting error. If a Financial Transaction was incorrectly applied on this claim to a Line Item, click the Financial Transaction button to obtain a list of all the Financial Transactions that had been entered and saved. Click the item to Disassociate it from the entry and click Save. Now that item may be entered and applied to the correct item.