
The On-Demand Macros tab (figure 13) enables the rapid entry of a group of service and/or product codes.
Figure 13
There are 2 scenarios in which the On-Demand Macros feature is very useful:
1. When the patient needs to be checked out prior to the doctor entering and saving today’s current data on the Treatment Plan window of ChiroPadEMR
2. When the practice uses only the ChiroOffice section of ChiroSuiteEHR and does NOT use ChiroPadEMR.
Regardless of which scenario is in place, the function is the same.
Click on the On-Demand Macros tab to display the list of Macro Codes (figure 14).
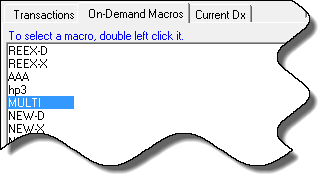
Figure 14
From the list that appears, select the Macro Code to use by double clicking on it. Automatically the system will return to the Transaction tab with the services and/or products from that Macro Code entered on the window.
The Macro Codes that appear on the On-Demand Macros tab can be created, edited, and/or deleted in the Procedures Catalog. At the very top of the ChiroOffice window, click on Tools. From the menu list, select Catalogs, and then Procedures. Once the Procedures Catalog is open, click on the Treatment Plans button (figure 15) in the upper right corner.
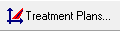
Figure 15
Creating Macro Codes
Creating Macro Codes to generate multiple line items of service is easy. The Treatment Plans window (figure 16) opens when the Treatment Plans button is clicked. It is where the Macro Codes are created.
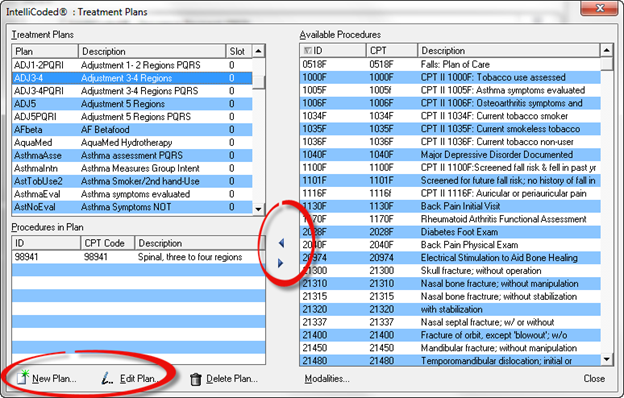
Figure 16
The Available Procedures box on the right lists all the services and products that are in the system. The Treatment Plans box at the upper right displays [1] all the Modalities in ChiroPadEMR and [2] all the Macro Codes that have been created in ChiroOffice. The box on the lower left Procedures in Plan shows the services and products that are in the Treatment Plan selected in the Treatment Plans box. The Macro Code Treatment Plans added through the ChiroOffice catalog are to be used as ChiroOffice appointment and transaction related plans only. To add a Treatment Plan for use as a ChiroPadEMR Modality, it must be created in the ChiroPadEMR Customization window. Consult the ChiroPadEMR documentation for more detailed instruction.
Create a new Macro Code by clicking on the New Plan button in the lower left corner. This opens the New Treatment Plan window (figure 17).

Figure 17
Create the ID for the Treatment Plan in the ID box. It can be anything you would like, letters, numbers, or a combination. The ID is used solely by the computer to identify this Treatment Plan. It does not appear in billing or SOAP notes.
Create a name for the Treatment Plan in the Description box.
Colors can be applied to the Treatment Plan. The effect of the color is to display on the Front Desk window of ChiroOffice and ChiroPadEMR. The color will appear only for the first Treatment Plan item shown in the Appointment Scheduler.
Select the number of time slots that this Treatment Plan should occupy. In other words, how much time will the doctor typically spend with a patient receiving the services in this Treatment Plan?
How many units of service should be applied to this Treatment Plan? Usually, the Treatment Plan has only 1 unit and if multiple units need to be applied, they can be entered in the Transaction window, or pre-set in the Procedure catalog.
When finished click OK, and the Macro Code for the Treatment Plan will be listed in the Treatment Plans box. It will be in alphabetical order by Description.
Now add the Procedures from the Available Procedures list. Find the Procedure, click it to highlight it, and then click the left arrow located between the columns. When the Treatment Plan window is closed, the Macro Code is ready for use. To be sure that it will appear in the On-Demand Macro Tab, close and reopen the ChiroOffice program to fully refresh the system.
Verify that the Macro Code is ready by opening the On-Demand Macros tab on the Transaction window in ChiroOffice. If it was set up correctly, it will appear on the list.
Editing a Treatment Plan
Editing a Treatment Plan is an easy process. Select the Treatment Plan by clicking on it and then click the Edit button. The same window (figure 17) that opened when the New button was clicked now appears with the information about the selected Treatment Plan. It gives the ability to rename the Treatment Plan, identify or change the color, and reset the numbers of slots and/or units.
Deleting a Treatment Plan
ChiroOffice Macro Code Treatment Plans can be deleted. Select the Treatment Plan by clicking on it and then click the Delete button. The system will verify that it should really be deleted, and then it will be gone.