NEW DIR
In order to create a Diagnostic Imaging Report
(DIR), click the  New icon at the upper left.
This will open the DIR
with today’s current date filled in and the defaults that had been selected in
Preferences. At this
point, if it is necessary to enter something different than the defaults, click
on the drop down arrow in each selection box, and choose the appropriate
alternative item. If the Exam
Date (figure 33) needs to be changed, click the Edit Pencil to separate the
date and time, and then change the date. After changing the date, click the
Edit Pencil again to
lock in and save the change.
New icon at the upper left.
This will open the DIR
with today’s current date filled in and the defaults that had been selected in
Preferences. At this
point, if it is necessary to enter something different than the defaults, click
on the drop down arrow in each selection box, and choose the appropriate
alternative item. If the Exam
Date (figure 33) needs to be changed, click the Edit Pencil to separate the
date and time, and then change the date. After changing the date, click the
Edit Pencil again to
lock in and save the change.
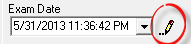
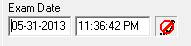
Figure 33
Note that if the Exam Date is different than
today’s current date, the DIR will NOT
appear in today’s current SOAP note but will still be saved as an independent
report in the DIR folder. In order for the DIR to appear in the current
note, the date of the DIR must be the same as the
current note being generated.
The DIR forces some items to be entered in proper sequence,
or the DIR does not allow progressing to the next item.
Region
Selection Box – In order to have findings, it is necessary to identify
which body area was examined. Click on the Region drop down arrow to
choose the specific body area(s) that was/were examined. Click on the item to
select it. This activates the Views selection box.
Views
Selection Box – Click on the Views drop down arrow to
select the imaging views that were taken of the patient. There
MUST be at least 1 view selected in order to activate the Findings.
Anomalies (figure 34) –
Although the Findings Selection
Box has been activated after the Views have been chosen,
BEFORE entering the Findings, examine the films
for Anomalies such as
extra or missing vertebrae. If Anomalies are present, be sure
to check them off in the Anomalies box at the upper
right of the DIR window.
Note that the Spine View
changes accordingly, verifying that Findings can not be entered
for a vertebral level that does not exist.

Figure 34
Findings
(middle column in figure 31) are entered by clicking on the specific
Finding from the Findings List. It may be
necessary to use the scroll bar on the right side of the Findings box in order to
locate the item needed.
Once a Finding item has been
selected, there are options to include additional details, but they are not
required, in the column to the right of the Findings box.
•
The first option is for Severity. Click on the Severity item so that it is
highlighted. To remove the selection, click it again so the highlight
disappears.
•
The second option pertains to the Location of the Finding. Simply place a check
in each box that applies to the patient.
•
The third option is for Extended Detail. This
additional data item does not pertain to all Findings, so there will be
some Findings that do
NOT offer Extended
Detail selections. When there is data to select in this box, click on the
Extended Detail item so
that it is highlighted. To remove the selection, click it again so the highlight
disappears.
For each Finding, after selecting the
Finding, Severity,
Location, and Extended
Detail, click on the vertebral levels that the Finding applies to. There are
some Findings that are
NOT spine related, such as gallstones or kidney calculi. The
system allows the entry of these Findings WITHOUT
clicking on any vertebral levels on the Spine View. As the selections
are made, they will appear in the box on the lower left of the DIR window.
Another optional section on the DIR window is Measurements
(figure 35) in the column on the far right under the Anomalies. The
Measurements include George’s Line, Cervical Curve Angle, Physiological Stress
Lines, Cervical Flexion/Extension Range of Motion, Sacral Base Angle, and the L3
Gravitational Plumb Line. For each Measurement that is done, place a check in
the box next to its name. This activates the selection boxes under each
heading.
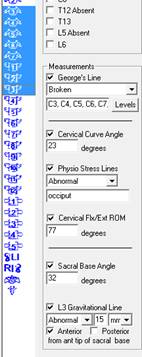
Figure 35
•
George’s Line –
If it is normal and unbroken, from the drop down selection box, choose Unbroken. If it is abnormal
and broken, from the drop down choose Broken. As soon as Broken is selected, the Spine View will change color.
On the Spine View, click
on the vertebral levels at which George’s Line is broken. If it
is broken at multiple adjacent levels, simply drag the mouse over those levels
while holding down the left mouse button. If it is broken at multiple
NON-adjacent levels, hold down the control key while using the mouse to select
all the vertebrae involved.
•
Cervical Curve
Angle – type in the measurement.
•
Physiological Stress
Lines – Note if it is Normal or Abnormal by making the
selection from the drop down box. If the Physiological Stress Lines are
Abnormal, then enter the
point at which they intersect in the text box.
•
Cervical Flexion/Extension Range of Motion – type in the measurement
•
Sacral Base Angle
– type in the measurement
•
L3 Gravitational Plumb
Line – From the left drop down box, note if it is Normal or Abnormal. Selecting Abnormal activates the 2 boxes
to the right. At the far right, choose the measurement scale (inches,
centimeters, or millimeters). In the middle box enter the measurement. Below the
measurement, note if the line falls anterior or posterior of the anterior tip of
the sacral base.