The New Transactions window has a large number of functions designed to enhance the automation of entries. Each of these functions helps the practice to flow smoothly while producing accurate billing.
Auto-Checkout Macro
This drop down box provides 3 options for service and product entries. For those using the complete ChiroSuiteEHR, a default option may be selected in Settings. As part of the patient Check-Out function, the default option will automatically enter the preferred option and enter the Transaction accordingly.
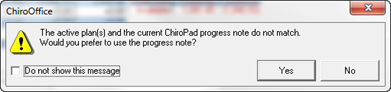
•Front Desk Wizard – This setting compares the entry that was made in the Appointment Scheduler for the current appointment with the entry that was made in the most recent ChiroPadEMR Plan window. If the 2 entries agree, the system continues the process of Transaction Entry. If there is a discrepancy between the Appointment Scheduler and the ChiroPadEMR Plan, a pop up message (figure 2) appears asking which should be used. Recognize that using the Progress Note means that the billing and documentation will match, which is an important consideration in the event of an audit.
Figure 2
•ChiroOffice Plan – Selecting this setting enters the charges based on the most recent entry made in the Appointment Scheduler, which may or may not agree with the documentation in the ChiroPadEMR SOAP Note. For those practices that use only the ChiroOffice portion of ChiroSuiteEHR and do not have ChiroPadEMR, this is the option that should be selected. It will require the office staff to verify that the services and/or products being charged were actually provided on that visit.
•ChiroPad Plan – Choosing this item means that the Transaction Entry will be made based on the most recent ChiroPadEMR Plan entry. Provided that the ChiroPadEMR Plan is entered on each visit BEFORE the Transaction Entry, then the SOAP documentation and billing will always match.
Discounts
Automated Discounts can be set up. There are 2 types of automated Discounts (figure 3) that are available with a single click of the mouse on the New Transaction window.
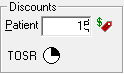
Figure 3
1. The General Patient Discount is set up in the Patient Info section on the Financial Tab. If you want to give this patient a discount on every visit, enter an amount in the New Charges Discount box on the Financial Tab. By clicking on the drop down arrow, select either percent (%) or specific dollar ($) amount. Next in the Transaction Types drop down box select who the Discount applies to, that is, Patient, Insurance, or Both. In some States a Discount may be given to one and not the other. Pay close attention to the laws of the state the practice is located in, as well as to Federal regulations regarding discounts. For example, Medicare limits the amount of gifts to any patient to only $50 (yes that is fifty) per year, and a Discount is considered a gift by Medicare. There are legal ways to give Discounts, but the rules vary by state. Before you create a standard Discount, find out how to make it legal. Once a Discount has been entered in the Financial Tab, whenever a Transaction is created, if the Red Tag was not clicked, the program will provide a pop up reminder asking if it should be applied.
2. The TOSR Discount (Time of Service Reduction) is set up in the Procedure Catalog. On the right side of the Procedure Catalog window, under the Fee/Unit Cost box, is the TOSR Discount box. A dollar amount for a Time of Service Reduction can be entered in this field. When entering a New Transaction, selecting the TOSR button from the New Transaction screen will apply this discount IF the item it applies to has been entered as part of the Transaction. Note that this TOSR Discount applies only to the service or product that it was entered on in the Procedure Catalog, not to anything else. This discount is not applied automatically, and the system does NOT give a reminder pop up that it is available. Someone must tell the staff person to give the TOSR Discount, and the staff person must click the TOSR button. Suggestion: have a TOSR Discount in the system for some services, and when a special show of appreciation is warranted for a patient, tell the staff to enter the TOSR Discount.
The statutes, laws, rules and regulations related to Discounts vary greatly from State to State, as well as within Federal programs such as Medicare. It is extremely important that the practice investigate exactly what applies to the specific practice location to avoid severe penalties. Something that is legal in one State may be a major crime in another. Also, be familiar with the terminology used in the various statutes, laws, rules and regulations.
For example, a Discount given to a Medicare patient is considered a Gift by Medicare; under current Medicare rules and regulations, a practice may give a patient Gifts of up to $50 (fifty) dollars per year. Anything over the $50 limit is considered an illegal incentive to bring patients to the practice. Although there may be exceptions made for hardship cases, it is imperative for the practice to know how to document a hardship case that would allow the giving of a larger Gift.
Payments
Entering a payment from the patient is easy. There are 3 buttons on the New Transactions window (figure 4), one for Cash, one for Check, and one for Credit Card.

Figure 4
Click on the appropriate button and ChiroOffice automatically enters a line item showing the Date of the Payment, the Provider it is applied to, the ID of the payment type. The entry of a Remark/Ck# is optional but recommended. A staff member must enter the amount of the payment in the Amount column.
To enhance the speed of entry, there is an option in the Settings section (Tools > Settings > Transactions) to have the cursor automatically go to either the Remark/Ck# column or the Amount column. The option is labeled Payment Auto Column and it determines the behavior of the cursor on the transaction screen. If a Remark is rarely or never entered when a payment is received from a patient, select Amount and the cursor will automatically appear in the Amount Column whenever one of the payment buttons is selected. If Remarks are normally entered when the patient makes a payment, choose Remark and the cursor automatically appears in the Remarks Column when one of the payment buttons is clicked.
The Credit Card button will enter additional information automatically IF the practice is using X-Charge Card Services for credit/debit card processing. With X-Charge in place, the patient’s credit/debit card is swiped, the dollar amount is entered, and when the approval/denial comes back, the last 4 digits of the patient’s card and the approval/denial code are entered in the Remarks/Ck# column and the amount paid is entered in the Amount column. If the practice is using any other card processing service, the Remarks and Amount need to be entered by a staff member.
Front Desk Collections
In the upper right corner is the box for Front Desk Collections (accrued since last statement) (figure 5). This box displays the amount due from the patient that the office staff should collect on the current visit.

Figure 5
There are 4 headings in this
box.
•Previous – This is the amount the patient should have paid in the past but has not.
•Patient – This is the amount that the patient’s insurance has determined is the patient’s responsibility.
•Copay – Usually displayed on the patient’s insurance card, this is the amount that the patient is supposed to pay at the time of each and every visit.
•Due – This is the total of the other 3 items. Ideally the office staff should be collecting this at the time of the visit.
Next Appointment
On the left side of the window, just under the Auto-Checkout Macro box is the Next Appointment box (figure 6).
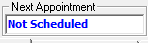
Figure 6
If the patient has another appointment scheduled, it will be displayed and the staff person should verbally confirm the appointment with the patient. If the patient does NOT have another appointment, the box will display Not Scheduled and it is up to the office staff to arrange the next appointment.
Save or Print Receipt Save
At the far left are 2 icons (figure 7), Save and Print Receipt Save.

Figure 7
•Save (Floppy Disk Icon) – Each and every transaction that is entered MUST be saved, or the entry will not lost. When the patient has requested to NOT be given a receipt, click the Save icon to record the entry in the system. Once saved, the charges will be available for both insurance claims and patient billing.
•Print Receipt Save (Printer Icon) – If a patient that has been set up for NO automatic receipt production requests a Receipt, this is the button that enable the printing of a receipt on demand. Click the icon and the Transaction is saved and a Receipt is printed.
Errors and Mistakes
Inevitably errors and mistakes occur. If the error or mistake is recognized before the Transaction is saved, there are 2 options to fix it. The choice of which option to use will be determined by the extent of the error or mistake.
•If only a single line item is incorrect, click on that line so that the cursor will appear on it. Hold down the Control key (Ctrl on some keyboards) and push the Delete key once. That line item is removed from the Transaction.
•If multiple line items have been entered in error, at the far right, just above the Amount column, click on the Clear Receipt button (figure 8). This will eliminate all entries on the New Transactions window enabling the user to restart the process.

Figure 8
SALT – Same As Last Time
Sometimes it is necessary to enter charges for a patient prior to the doctor’s completion of the SOAP note. If it is 100% known that the Transaction for the current visit is identical to the Transaction for the most recent previous visit, then the staff person may click the SALT button (figure 9). This will enter the charges exactly as they were on the last visit, just with the current visit’s date, that is, Same As Last Time. The SALT button is located to the left of the Clear Receipt button, just above the Copay column.

Figure 9
Future Appointments
When a patient has been scheduled for an appointment, especially for multiple appointments, it is very beneficial to give the patient a written list of his/her appointment schedule. The Future Appointments button (figure 10), located to the left of the SALT button and above the Remark/Ck# column serves this purpose. Click on the Future Appointments button to open a report listing all the upcoming appointments for this patient. At the top of the Future Appointments report, click on the Printer icon to print it and hand it to the patient. Giving the written schedule to the patient has the effect of reducing missed appointments and having better patient compliance with the recommendations that were given for the patient’s benefit.

Figure 10
Suppress Visitometer
Sometimes a Transaction is entered that should not be counted towards the insurance visits that are allowed for the patient. An example is when the patient stops in to pick up some type of item that is supplied by the office because the prior was has either run out (such as vitamins) expired or broken ( such as hot/cold gel packs). In this scenario, the patient comes in and picks up the needed item but does NOT have an office visit or any actual treatment. If this is the case, then place a check in the Suppress Visitometer checkbox (figure 11). The Suppress Visitometer checkbox is located to the left of the Future Appointments button and above the Modifier column. Note that in some States it is a legal requirement for the patient to have an office visit whenever anything is dispensed. Verify the law in the State where the practice is located to be sure the practice is compliant.

Figure 11