Macro codes to generate multiple line items of service are easy to enter. These treatment plans added in this fashion are to be used as ChiroOffice appointment and transaction related plans only. If you wish to add a plan for use as a ChiroPadEMR modality, it must be created in the ChiroPadEMR customization window. Consult the ChiroPadEMR documentation for more detailed instruction.
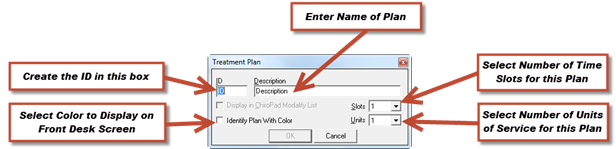
Click on the New Plan button on the lower left of this window, which opens the window shown in figure 34.
Figure 34
Create the ID for the Treatment Plan in the ID box. It can be anything you would like, letters, numbers, or a combination. The ID is used solely by the computer to identify this Treatment Plan.
Create a name for the Treatment Plan in the Description box.
Colors can be applied to the Treatment Plan. The effect of the color is to display on the Front Desk window of ChiroOffice and ChiroPadEMR. The color will appear only for the first Treatment Plan item shown in the Appointment Scheduler.
Select the number of time slots that this Treatment Plan should occupy. In other words, how much time will the doctor typically spend with a patient receiving the services in this Treatment Plan?
How many units of service should be applied to this Treatment Plan? Usually, the Treatment Plan has only 1 unit and if multiple units need to be applied, they can be entered in the Transaction window, or pre-set in the Procedure catalog.
When finished click OK, and the macro code for the Treatment Plan will be listed in the Treatment Plans box. It will be in alphabetical order by Description. Now add the Procedures from the Available Procedures list. When the Treatment Plan window is closed, the macro code is ready for use. Accessing it is described in the section of this manual about the Transaction window and Appointment scheduling.
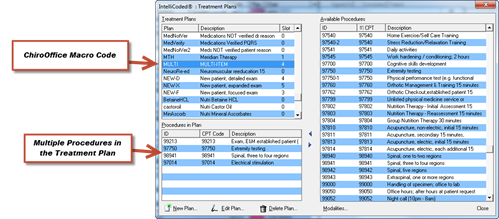
Figure 35
Editing a Treatment Plan
Editing a Treatment Plan is an easy process. Select the Treatment Plan by clicking on it and then click the Edit button. The same window (figure 34) that opened when the New button was clicked now appears with the information about the selected Treatment Plan. It gives the ability to rename the Treatment Plan, identify or change the color, and reset the numbers of slots and/or units.