Once the Master Catalogs and Settings have been established, and individual patient data in the Patient Information screens has been entered, ChiroSuiteEHR is ready to enter clinical information for the patient in the ChiroPadEMR section. This chapter provides an overview of the ChiroPadEMR portion of ChiroSuiteEHR.
If staff members have created a patient record by entering data in the Patient Information screens before the doctor begins examining the patient, then, even on the first visit, clinical findings can be entered directly into ChiroPadEMR. In many practices, the doctor is anxious to provide the patient with the most rapid relief possible, and takes the patient into the examination/treatment room before the Patient Information window has been completed. If this is the case, then it will be necessary to have the initial examination and history on paper and transfer them later into ChiroPadEMR.
ChiroPadEMR is a very flexible program. The user has the option of using the various buttons, features and functions in any sequence. One of the unique features of ChiroPadEMR is that it provides the freedom to enter findings and information based on the practice instead of forcing doctors to follow a predetermined protocol. For purposes of this manual, a linear progression of the functions and features is given. It is important to note that ChiroPadEMR does not force the use of its various features and screens. Each doctor/provider uses only those features and screens that pertain to his/her own method of practice.
Prior to using ChiroPadEMR be sure to establish the Settings that will work best for the practice. Note that if each doctor in the practice has his/her own computer, the Settings are computer specific. This means that the Settings may be different on each computer. Refer to Chapter 9 User Preferences and Settings for more details. The ChiroPadEMR specific information is the last section of Chapter 9.
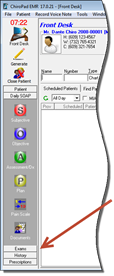
From the ChiroPadEMR Front Desk double-click a patient’s name to open that patient’s file. (For additional instructions on finding patients, or opening patient files, please refer to Chapter 10: Front Desk Operations.) When the patient’s file opens, the Icon bar changes to display the options available. If the patient’s name was in the Scheduled Column, the account is open and remains on the Front Desk window. This enables the user to select and go directly to anyplace in the system. If the patient’s name was in the Signed-In Column, based on the selection made in Settings, the patient’s account opens to the screen that had been selected as the default.
Figure 1
Depending on the screen resolution on the computer and the size of the open window, all the buttons within a section may not be visible. If all buttons are not visible, buttons for an up-arrow (▲) and/or down-arrow (▼) will appear providing access to the additional icons (figure 2). Clicking on one of these arrows will reveal the additional buttons.
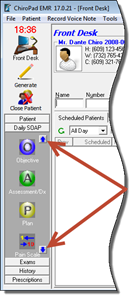
Figure 2