Prior to adding an Insurance Carrier to the patient’s file, verify that the Insurance Carrier has been entered in the Insurance Carrier Catalog. Please refer to the section about Insurance Carrier Catalogs in Chapter 7 Master Catalogs.
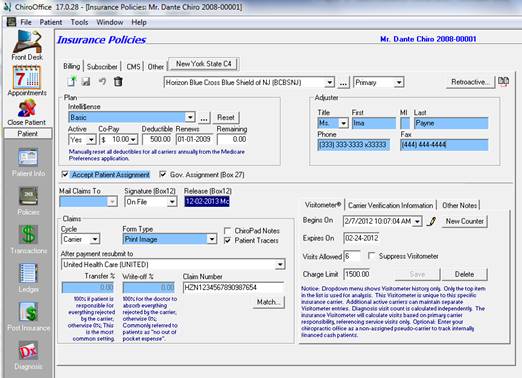
Adding an Insurance Carrier to a patient’s account is accomplished through the Insurance Policies screen. To add a carrier to the patient’s file, click the New icon. The New icon is located directly under the Billing tab.
Figure 1
After clicking the New icon, the Browse Carrier Catalog window (figure 2) will open. This is where the Insurance Carrier that applies to this patient is selected, provided that the Insurance Carrier has been entered in the Insurance Carrier Catalog.
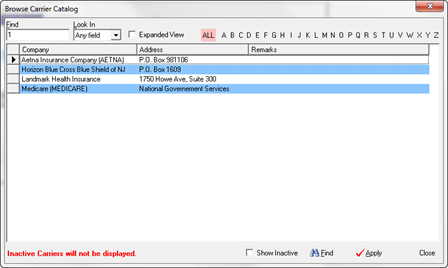
Figure 2
There are several methods of using the Browse Carrier Catalog to find the Insurance Carrier needed for the patient.
1. The most common method of finding an Insurance Carrier is to use the Find box in the upper left corner of the window. The Look In drop down box provides the ability to restrict the Find function to specific fields. However, most offices use the default of Any Field. Simply type in anything related to the specific Insurance Carrier and tap the Enter key on your keyboard. All the Insurance Carriers that meet the criteria entered will appear on the list. The more characters typed into the Find box, the faster the Insurance Carrier needed will be found. Select the Insurance Carrier that applies to the patient by
a. Double clicking the Insurance Carrier, or
b. Single click the Insurance Carrier and then click the Apply button on the lower right.
2. At the middle of the top of the Browse Carrier Catalog window is the ALL button. Click on this and all the Insurance Carriers in the system will be listed. Scroll through the list until the required one is found. Select the Insurance Carrier that applies to the patient by
a. Double clicking the Insurance Carrier, or
b. Single click the Insurance Carrier and then click the Apply button on the lower right.
3. To the right of the All button are the letters of the alphabet. Click on any letter to obtain a list of the Insurance Carriers that begin with that letter. Select the Insurance Carrier that applies to the patient by
a. Double clicking the Insurance Carrier, or
b. Single click the Insurance Carrier and then click the Apply button on the lower right.
Between the Look In drop down and the All button, there is a checkbox for Expanded View. Place a check in the box and the list of Insurance Carriers will expand to display the Insurance Carrier’s phone number and full address as well as Notes that had been entered in the Insurance Carrier Catalog Notes box.
As soon as the Insurance Carrier has been selected, the Browse Carrier Catalog window will close, and ChiroOffice returns to the Insurance Policies window Billing tab, with the Insurance Carrier default information entered in the fields. Note that patient specific data will now need to be entered.
Many patients are covered by more than one Insurance Carrier. To enter the additional Insurance Carrier(s), repeat this process until all the Insurance Carriers that actively apply to the patient have been entered. To switch between the Insurance Carriers, click on the drop down arrow in the Insurance Carrier Name box and click on the Insurance Carrier that you want to open.
Once all the Insurance Carriers have been entered, be sure to set each to the correct status as primary, secondary, tertiary, etc. To set the status of each Insurance Carrier to primary, secondary, etc., select the Insurance Carrier from the Name box, click on the drop down box at the top of the screen that is to the right of the Insurance Carrier name. After setting the Insurance Carrier that appears in the Name box, switch to the next Insurance Carrier to set it, and repeat until all the Insurance Carriers have been set to the correct status.
The Insurance Policies section includes 5 tabs that must be completed in order for claims to be created and submitted correctly. The 5 tabs are
1. Billing Tab
2. Subscriber Tab
3. CMS Tab
4. Other Tab
5. New York C4