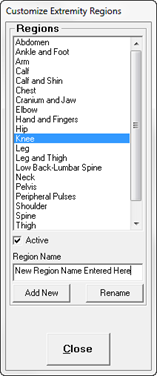
To add a new Region to the list, type the Region Name in the Region Name text box under the list, and click the Add New button. This will add the new Region to the bottom of the Extremity Regions list. In order to see the new addition to the list, it may be necessary to use the scroll bar. The items will appear on the list in alphabetical order after the Close button has been clicked.
After adding all the new Regions, click the Close button to exit the window and save the entry(ies). Reopen the Customize Extremity Regions window to verify that the new items are sorted alphabetically.
Figure 2
Deleting an Extremity Test Region
A Region can not be deleted from the system. The only option is to Make Inactive. Click on the Region Name on the list to highlight it. Under the list, above the Region Name text box, is a check box for Active. Remove the check from the box to make the selected Region Inactive. Once the Region is made Inactive, although it will still be visible on this window it will no longer appear on the Region List in a patient’s Extremity window.